The Ultimate Guide
Optogenetic stimulation is a genetic technique that enables scientists to activate or inhibit the activity of specific neuron populations using light. In this guide, we will explore the key questions related to optogenetics.
Optogenetic Stimulation
Chapter 1: What is Optogenetics?
Chapter 2: What Equipment Do You Need to Perform Optogenetic Stimulation?
Chapter 3: Selecting an Optogenetic Light Source: LED vs. Laser
Chapter 4: Widefield Vs. Cellular-Resolution Optogenetics: What’s the Difference?
Chapter 5: What Systems are Available for Cellular-Resolution Optogenetics?
For years, neuroscientists have been fixated on understanding how behavior and cognition arise from neural circuit activity.
To begin investigating these questions, scientists have been employing slow pharmacological and imprecise electrical stimulation techniques to control neural activity. However, with different classes of neurons communicating through vast, complex networks and fast electrical signals, it is essential to develop a method that can control neurons with precision to decode the function of neural circuit activity.
In 1979, Francis Crick proposed a novel solution: use light to control neurons (Boyden et al. 2005). Derived from this very idea and with the effort of many scientists, the revolutionary technique of optogenetics was born.
Optogenetics, a genetic method to turn select neurons on or off with light, was invented in 2005 by Karl Deisseroth and Edward Boyden (Boyden et al. 2005). Notably, their development of optogenetics began with a discovery by Peter Hegemann who successfully expressed the blue light-depolarizing opsin, channelrhodopsin-2 (ChR2), in cell culture (Nagel et al. 2003).
Expanding upon these findings, Deisseroth and Boyden virally expressed ChR2 in neurons, and, miraculously, they demonstrated for the first time that neurons could be activated using blue light (Boyden et al. 2005).
With millisecond precision, optogenetics enables the fast control of neuronal spiking. As a technique using both optics and genetics, the term opto-genetics was coined from their extraordinary findings

Optogenetic-expressing cells (in blue) are activated by blue light illumination.
How Does Optogenetics Work?
Optogenetics began with the discovery of opsins, such as ChR2. Opsins are light-sensitive channels that cause the depolarization or hyperpolarization of neurons through mechanisms such as the influx of ions or protein signaling cascades (Kim et al. 2017).
Opsins are sensitive to specific wavelengths of light, leading to the activation or inhibition of neural activity. For example, blue light (~470 nm) activates ChR2, causing an influx of Na+ ions and, in turn, depolarizing the neuron (Boyden et al. 2005). With viral expression and transgenic animal models, researchers can target optogenetic probes to genetically-defined neuron populations and across brain-wide projections (Kim et al. 2017).
Multi-disciplinary collaborations between neuroscientists, biologists, and engineers have led to the expansion of the optogenetic toolbox. Opsins have been discovered for manipulating neurons on or off at varying speeds and with different wavelengths of light (see Table 1). For example, Halorhdopsin, an inhibitory opsin, was found to turn off neurons, and red-activated opsins, such as JAWS, were developed to penetrate deeper into the brain (Kim et al. 2017).
| Optogenetic Construct | Excitation Wavelength | Function |
|---|---|---|
| ChR2 | 470nm | Activation |
| GtACR2 | 470nm | Inhibition |
| ArchT | 540nm | Inhibition |
| C1v1 | 560nm | Activation |
| NpHr | 590nm | Inhibition |
| bReaChES | 590nm | Activation |
| Chrimson | 590nm | Activation |
| ReaChR | 620nm | Activation |
| JAWS | 620nm | Inhibition |
What are the Applications of Optogenetics?
Optogenetics has benefited many scientific fields by providing the ability to control the activity of different cell-types with millisecond precision.
In neuroscience, optogenetics has enabled scientists to link neural circuits, behaviour, and function (Kim et al. 2017). Optogenetics can be performed both in vitro with electrophysiology and in a behaving animal with calcium imaging. Of great benefit to neuroscientists, optogenetics has been adapted for use in rodents, primates, C.elegans, drosophila, and zebrafish to study the neural correlates of cognition and behavior.
As a precise method to control cellular activity, optogenetics has impacted scientific fields beyond neuroscience with recent contributions to cell biology and cardiac research (Repina et al. 2017; Ferenczi et al. 2019).
From a clinical perspective, the application of optogenetics has begun to be used for exploring vision restoration and deep-brain stimulation in motor diseases (Towne & Thompson 2016).
With a causal method to analyze the function of neuron activity in real-time, optogenetics has advanced our understanding of the brain and may one day have significant clinical implications.

An example demonstrating the use of optogenetics in slice electrophysiology.
Optogenetics unlocks the ability to activate or inhibit select populations of neurons. With this technique, researchers have been able to investigate the causal relationship between neural activity, function, and behaviour. The popularity of optogenetics is evident from the surge in publications featuring the technique since its invention in 2005 (Boyden et al. 2005).
Labs that are new to the technique are probably wondering, what equipment do you need to perform optogenetics?
Biological Components
The first step to successfully perform optogenetics is grasping the biological components. This consists of selecting the appropriate optogenetic probe, expressing the optogenetic probe in the brain region and neurons of interest, and implanting an optical cannula (if you are performing freely-behaving experiments).
Expression
The crucial first step for optogenetic experiments is selecting the appropriate optogenetic probe.
Do you want to activate or inhibit the neuron population of interest? How fast do you want to stimulate the population of interest? Do you need to use a specific wavelength for optogenetic stimulation (e.g., combining with imaging)?
These are some of the questions that will help you choose the appropriate optogenetic probe for your experiments (see here for a great guide from Addgene summarizing currently available optogenetic probes).
Once you’ve selected the optogenetic probe, it must be expressed in the brain. Neuroscientists employ two methods to express constructs in the brain: viral expression and transgenic mouse models.
Viral expression involves injecting a virus encoding an opsin in the brain (Mei & Zhang 2012). This virus is linked to a gene of interest that targets expression to a specific cell-type (Mei & Zhang 2012).
Neuroscientists employ viral expression to regulate opsin expression or restrict it to a particular brain region. This is useful because expression can vary depending on the brain region, cell-type, or virus. In addition, neuroscientists can use viral expression to express opsin in brain projections to map neural circuits across brain regions (Mei & Zhang 2012).
In comparison to viral injections, transgenic mice models are designed to express opsins throughout the entire brain (Mei & Zhang 2012). Depending on the transgenic model, opsin expression can vary from region to region, such that one region may express the opsin more than the other. Transgenic mouse models may be used to produce more stably reproduced mouse lines for optogenetic expression in specific cell-types. Or, neuroscientists examining large cortical areas use these models as they require much more widespread expression, rather than a single region of interest.

Optogenetic probes can be expressed through viral expression (on the left) and this limits expression to a specific cell-type and localizes in a specific brain region. In comparison, transgenic expression (on the right) is widespread throughout the brain.
Implantation of a Cannula (For Freely-Behaving)
For freely-behaving optogenetic experiments, light needs to be transmitted into the brain while the animal is moving. This is accomplished by surgically implanting an optical cannula into the brain region expressing the optogenetic probe. An important step in selecting an optical cannula is selecting the appropriate length to reach the target brain region.
Once implanted, a light source is connected via a fiber-optic cable (see below for more details) and the area below the cannula will be illuminated. The spread of light and penetration depth will be dependent on tissue and light source wavelength (this is a helpful calculator from the Deisseroth lab: https://web.stanford.edu/group/dlab/cgi-bin/graph/chart.php).

An optical cannula is implanted into the region expressing the optogenetic probe.
Equipment Components
Two experimental setups are used for optogenetic experiments: microscopy and freely-behaving. These two different approaches for optogenetic stimulation have distinct components.
Microscope Optogenetics
Optogenetics can be performed during microscopy experiments and synchronized with other microscopy methods.
For neuroscience experiments, researchers commonly integrate optogenetics into their electrophysiology rigs—usually on a standard epi-fluorescence microscope—to probe neural activity during their recordings (Andrasi et al. 2017), or they integrate optogenetics with their two-photon imaging experiments to probe neural activity during imaging (Forli et al. 2018).
For cell biology, researchers will integrate optogenetics into their confocal imaging experiments to probe different genetic perturbations (van Haren et al. 2018).
For these microscopy setups, there are two main components required to integrate optogenetics: a light source and a filter set. The light source is used to illuminate the sample and activate the optogenetic probe, and it is important to select the appropriate light source for your optogenetic probe.
For most microscopy setups, a collimated light source will be connected to the back epi-fluorescence port to illuminate the sample. Depending on the light source, it will be connected via direct coupling to the backport or coupled via lightguide/fiber to the epi-fluorescence port.
Light will travel through the epi-fluorescence port to the filter turret, where it will be directed onto your sample through the objective. The objective will dictate the field of view and power of the light source for optogenetic stimulation (i.e., lower magnification leads to a larger field of view but also lower light intensity).
As mentioned above, the light will be directed to the filter turret before being reflected onto the sample. Thus, it is crucial to select the appropriate filter set to direct the correct wavelength to the sample, and potentially block it from reaching the camera depending on your experiment.
Another method is to externally illuminate the sample independent of the microscope. A fiber-coupled light source or spotlight light source may be used for this particular application. This method may be used because the epi-fluorescence port is already occupied or you want to target part of your sample.
Of importance, researchers want to accurately synchronize their optogenetic stimulation with either electrophysiology or imaging equipment. The ability to synchronize and control the light source via analog or TTL signals is crucial for proper synchronization. For example, researchers may want to illuminate their sample for a specific amount of time during an electrophysiology recording.

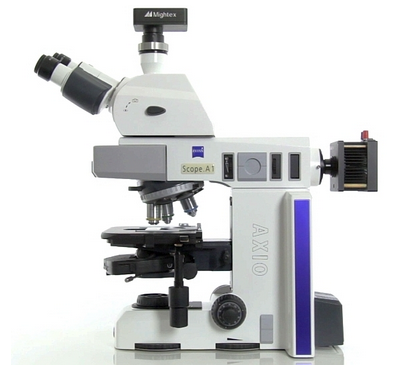
Example microscope optogenetics setup.
Freely-Behaving Optogenetics
Optogenetics provides a causal method to test the link between neural circuits and behaviour. Thus, researchers need to perform this method in a freely-behaving animal, which requires a different setup compared to microscopy experiments.
There are three main components for freely-behaving experiments: an optical cannula, a fiber-optic cable, and a light source.
As previously mentioned, the optical cannula is implanted into the region of interest expressing the optogenetic probe to illuminate light into the brain. Generally, the optical fiber is coupled to the optical cannula and connected to a fiber-coupled light source. This enables light to travel from the light source to the brain of the freely-behaving animal. A flexible optical fiber allows the animal to behave freely and illuminate the brain for optogenetic stimulation.
Depending on the complexity of the animal’s behaviour, researchers may use a commutator, which prevents the fiber from getting twisted and restricting the animal’s behaviour.
Researchers may want to synchronize optogenetic stimulation with certain behavioral events or equipment, similar to microscopy optogenetics experiments. For example, if an animal moves into a certain region, researchers may want to perform optogenetics for a specific amount of time. This is possible through synchronization with TTL or analog signals.

Example setup for freely-behaving optogenetics.
When selecting an optogenetic light source, you need to consider two key factors: the required light wavelength and intensity.
First, the opsin you select has a specific activation spectrum, such that an opsin will only be activated by certain wavelengths of light. An opsin usually has a peak wavelength at which it will require the least power to elicit a response. Wavelengths farther away from the peak wavelength will require a more powerful light output to elicit an optogenetic response. Therefore, it’s best to choose a light source closer to the peak wavelength to achieve optimal activation. For example, most researchers will use wavelengths close to 470nm for optogenetic activation of ChR2.
Second, the required light intensity for your experiment is dependent on the field of view and the opsin you select. The field of view, which is dependent on the optical fiber (for in vivo experiments) or the microscope objective, will determine how large of an area you need to cover with your light source. Opsins have an intensity threshold for eliciting a response, resulting from illumination. These two variables are directly coupled, such that optimal illumination power is required to elicit a response, and increasing the field of view requires more power as you have to cover a larger area with a given minimum intensity.
Now that you understand the requirements for an optogenetic light source, let’s discuss the two most commonly used light sources for this application: LED light sources and laser sources.
You may be wondering, what are the differences between these light sources? Which light source is best for my optogenetics experiment?
LED Light Source
LEDs are a prime choice for optogenetic experiments for a multitude of reasons. To start, LEDs are low cost and eye-safe, as well they have a long lifetime, making them a great choice for any lab looking to perform optogenetics.
Of importance, LEDs come in a wide-range of wavelengths (UV to NIR), and hence, scientists can usually find the appropriate LED that best fits their choice of opsins. Depending on the wavelength, the available output power can vary significantly between LEDs. In the visible range, LEDs can produce a large amount of power, so they are an ideal solution for most optogenetic experiments.
Compared to other typical microscopy light sources, such as halogen or xenon lamps, LEDs have a low operating temperature and do not require any heat up or cool down time. This allows LEDs to be easily turned on and off for easy use during experiments, and scientists can easily modulate the intensity or pulse of the LEDs without worrying about their stability or causing damage. Furthermore, LEDs have a much longer lifetime than traditional light sources, and they do not require frequent replacement of bulbs, making them a more sound investment in the long term.
Importantly for optogenetic experiments, LEDs can be switched on and off with microsecond timing for pulsing protocols. LEDs are easily triggered via TTL to synchronize pulsing with external equipment.
Compared to a laser source, LEDs have relatively high divergence, causing the power of the LED to be spread across the field of view, although on this front LEDs are far better than the traditional light sources, such as a mercury lamp or a halogen lamp. As a result, LEDs are not ideal for applications such as laser-scanning systems in which light must be tightly focused into a tiny spot to provide the necessary spatial resolution for point-by-point scanning across the field of view.
Secondly, LEDs, compared to lasers, also have wider spectral bandwidth. This may or may not harm your experiments, as you can easily block off the tails of the LED using optical filters. However, using optical filters could lead to a lower overall output power from the LED, as the output power is based on the full spectrum of the LED light source.
LEDs are suitable for a wide-range of optogenetic experiments. A popular use of LEDs is for widefield optogenetics on a microscope. LEDs are easily integrated into upright and inverted microscopes, they provide sufficient output power for stimulation of all optogenetic probes. In addition, LEDs are easily synchronized with electrophysiological equipment.
LEDs are also ideal for freely-behaving optogenetics experiments, as they can be coupled with an optical fiber while providing sufficient power for such experiments.
Laser Source
Lasers are commonly used for optogenetic experiments that require higher intensity and/or tighter focus of light. Lasers provide very high intensity in a single spot, and hence, they are often used for laser-scanning applications.
Compared to LEDs, lasers have a very narrow spectral width, enabling users to gain high intensity at a specific wavelength. Lasers can be well collimated to fit on a microscope, or they can be efficiently coupled into an optical fiber for optogenetic experiments that require high optical power.
Although lasers provide high intensity for optogenetics experiments, there is a list of potential drawbacks. In itself, the high output power may be a pitfall for specific optogenetic experiments. In particular, for standard microscopy experiments, lasers may provide too much output power and cause tissue damage. For microscopy, the laser beam must be expanded to cover the field of view and must be corrected for laser speckle.
Unlike LEDs, lasers have limited availability of wavelengths; they are also much more expensive than LEDs, and they may require eye safety measures, such as interlock.
Due to higher optical coupling efficiency, lasers are particularly useful for performing optogenetics across a large area, such as a macroscope. Lasers can also be used for in vivo optogenetic applications where high intensity may be needed; however, most LEDs are suitable for in vivo optogenetics applications.
Where lasers can outperform LEDs is for laser-scanning and two-photon microscopy optogenetic experiments, as they can provide high-intensity in a small spot at longer wavelengths.
Optogenetics is a technique to manipulate genetically-defined neural activity with light, and it has two main advantages:
- Millisecond Temporal Precision
- Genetically-Defined Spatial Precision
Temporal precision enables researchers to turn neurons on or off with millisecond timing. This fast timing can closely mimic the firing rates of neurons in the brain.
Spatial precision enables researchers to manipulate the activity of genetically-defined neuron populations (e.g., inhibitory neurons). This provides a causal link between the manipulation of the genetically-defined population and the variable being measured.
In optogenetic experiments, only neurons expressing the optogenetic probe are controlled, leading to activation or inhibition of those neurons.
However, standard optogenetic light sources can only illuminate the entire field of view and, as a result, they stimulate all neurons expressing the optogenetic probe. Such a system may be adequate for some experiments in which all optogenetic-expressing neurons can be stimulated at the same time, but more advanced experiments may require the specificity to selectively stimulate individual neurons within the field of view.
The ability to illuminate select neurons within a population of optogenetic-expressing neurons is called cellular-resolution optogenetics (Shemesh et al. 2017). This method requires more sophisticated spatial specificity to selectively stimulate individual neurons within an optogenetic-expressing population.

Comparison between widefield and cellular-resolution optogenetic stimulation.
The ability to illuminate certain individual neurons is not a limitation of optogenetics, but a limitation of the standard optogenetic light sources used in most optogenetic systems. Standard light sources can only illuminate all cells within the field of view, and they cannot control where they illuminate to target individual neurons.
The development of spatially targeted light technologies has enabled researchers to control where light illuminates the sample, such as an individual cell, making cellular-resolution optogenetics possible (Ronzitti et al. 2017). For example, a digital micromirror device (DMD), such as Mightex’s Polygon, allows researchers to illuminate multiple individual neurons or regions simultaneously to perform cellular-resolution optogenetics.
Cellular-resolution optogenetics has multiple applications in the field of neuroscience. For example, scientists can study neural circuits and decode neural patterns at the level of individual neurons (Anastasiades et al. 2020; Tran et al. 2019). These types of studies have been carried out both in vitro and in vivo using different technologies (Shemesh et al. 2017; Anastasiades et al. 2020; Tran et al. 2019; Chen et al. 2019). The experimental applications for cellular-resolution optogenetics are endless.
The ability to illuminate select neurons within a population of optogenetic-expressing neurons is called cellular-resolution optogenetics (Shemesh et al. 2017). To use this technique, researchers require more sophisticated spatial specificity to selectively stimulate individual neurons within an optogenetic-expressing population.
The development of spatially targeted light technologies has enabled the control of where light illuminates the sample, such as an individual cell, making cellular-resolution optogenetics possible (Ronzitti et al. 2017).
What systems are available for cellular-resolution optogenetics?
Galvo-Scanning
Galvo-scanning uses a serial scanning method where a focused beam of light is directed to a specific region of the sample using a pair of galvanometer mirrors.
This “galvo-based scanning” technique typically uses a high-powered laser beam (either tunable or fixed-wavelength) for optogenetic stimulation. The illumination is restricted to a single spot at a time, and the intensity of the spot follows a Gaussian distribution. Patterns more complex than a single spot are traced out on the sample by illuminating different points sequentially, commonly by raster or spiral scanning, which are each useful for different experimental conditions.
As patterns are generated by serial scanning, the temporal precision of this system is primarily restricted by the positioning actuators of the galvanometer mirrors. Conventional galvo-based scanning systems take ~100 μs to redirect the beam to a new ROI. Consequently, pattern generation by scanning through the full field of view can take a significant amount of time. These limitations of temporal precision in this system present an issue for stimulating and recording fast physiological events, such as the generation of action potentials, which fire on the order of 100s of Hz.

A galvo-scanning setup.
A key limitation of galvo-based scanning systems is that only a single, small spot can be illuminated at a given time. This inability to illuminate multiple regions of interest simultaneously fundamentally restricts the applications of the system, as it cannot address questions about how multiple neurons behave simultaneously.
The advantage of galvo-scanning is the minimal loss of light intensity along the optical pathway. Therefore, the focused beam offers good illumination intensity onto the sample, allowing the same system to be used for both light delivery and imaging. Furthermore, the illumination is fairly uniform and is not susceptible to background interference from other light sources.
Cellular-resolution optogenetics using a galvo-based scanning system is generally user-friendly and easy to integrate with existing systems and can be used for both in vitro and in vivo head-fixed experiments. While the galvanometer mirrors themselves are not particularly expensive, the requirement for high-powered lasers, which are a significant cost, and the software for controlling the galvos can lead to an expensive system.
Holographic Projection
Parallel excitation, as in phase and amplitude, spatial light modulation techniques may be used for cellular-resolution optogenetics. Parallel excitation methods are more adaptable to a variety of experimental needs, as they allow simultaneous illumination of multiple diffraction-limited spots on the sample.
Phase modulation commonly takes advantage of computer-generated holograms (CGHs) to stimulate multiple points at once. The desired illumination pattern is designed on a computer, after which the projection for patterned illumination is generated by a numerical algorithm that calculates the appropriate phase hologram. This hologram is then projected onto a spatial light modulator (SLM). A reference beam is reflected onto the SLM and through a set of imaging optics, to deliver a reconstructed illumination pattern onto the sample.
Holographic systems have the advantage of being able to stimulate any number and shape of three-dimensional patterns simultaneously onto the sample. Another advantage compared to galvo-based scanning is the holographic system offers far greater temporal resolution than serial scanning methods.
Holographic systems require up to several minutes to calculate and generate new patterns. This means for applications requiring quick or real-time pattern generation the holographic method would not be the most suitable. As the computation of new holographic patterns may take minutes to produce, this method is not suitable for applications requiring real-time pattern generation, uploading, and activation.

A holographic projection setup.
While this system theoretically achieves good illumination intensity, in practice, there are some efficiency concerns. Illumination spots are non-uniform, characterized by a bright focus with continuously diminishing intensity towards edges (Lutz et al. 2009). This results in poor contrast between illumination points and background and, hence, poorly defined edges of illumination.
The holographic system is the most costly and most difficult to integrate with existing systems. Holographic systems require a fair amount of expertise to use properly and can be very expensive, due in large part to the high cost of the parts (lasers and SLM, as well as computer hardware and software). There are also concerns with the lack of reliable precision and repeatability of the patterned illumination for the system, in particular with unintended speckling patterns. Holographic systems, therefore, require a significant level of expertise to create a working system for experimental use.
DMD Illuminator
A third system commonly used in optogenetic experiments employs a digital micromirror device (DMD), such as Mightex’s Polygon DMD Illuminator. A DMD is an array of many microscopic mirrors which can each be independently controlled.
When illuminated, each micromirror corresponds to a pixel in the illumination pattern that is defined by the user, and it can be individually and independently controlled to reflect light onto the sample. Mirrors are rotated approximately 12 degrees to either an on- or off-state (Knapcsyk & Krishnan 2005).
As with holographic pattern projection, DMD systems can stimulate multiple discrete ROIs simultaneously, allowing for parallel excitation of multiple cells while maintaining high contrast against the background. Because the micromirror array acts to reflect single pixels of light onto the sample, the illumination spot size on the sample is limited only by the objective lens and the number of micromirrors on the DMD chip.

A DMD illuminator setup.
An advantage of pixelation with high contrast is that the illumination will be well contained within the pattern area. The sharp illumination edge helps ensure that light is only directed to the area of interest and that there is no spillover into unwanted regions. This can help provide more control to the excitation experiment.
A key advantage of the system is temporal precision (Wilt et al. 2009). Real-time pattern generation can also be achieved, and this is especially useful in closed-loop experiments where a moving target is being tracked and a precise illumination pattern must be generated and delivered to the target.
Unlike the galvo-scanner or the holographic projector, a DMD illuminator can be used with virtually any light source (e.g. lasers, LEDs, Xenon, metal halide, etc.) to illuminate the sample, making it a versatile system.
DMD-based systems have a high degree of illumination uniformity across the sample, meaning not only is uniformity maintained over a given illumination area, but also that intensity is consistent over discrete illumination areas, regardless of position in the field of view. Moreover, there is very little background noise (contrast ratio of 1000:1) to cause interference in the illumination, and no unwanted illumination patterns are generated, as is the case with galvo-scanning systems.
Typically DMD systems are most useful for studying the effect of activation of cell types in specific patterns (Blumhagen et al. 2011; Munch et al. 2009). DMDs have been widely used for in vitro optogenetics, as well as in vivo optogenetic experiments using organisms such as C. elegans (Leifer et al. 2011), zebrafish (Zhu et al. 2012), and mice, wherein optical access to the behaving animal is possible.
Of the three systems discussed in this paper, the DMD system offers the greatest ease of use at the lowest cost. It is easily integrated with existing commercial microscopes and is highly adaptable.
System Comparison Table

for Cellular-Resolution Optogenetics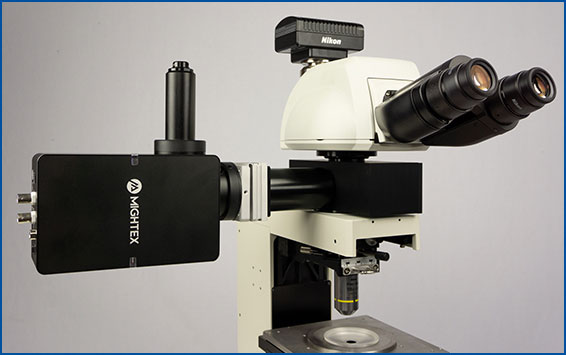
spatiotemporal control of light with subcellular resolution.