


If someone were to describe in vivo calcium imaging to you, it might sound quite simple.
When you dig deeper, you start to appreciate the complexity associated with the biology and equipment required to perform calcium imaging in freely-behaving animals.
You’re probably asking, what is needed to perform in vivo calcium imaging?
Biological Components
Brains don’t naturally express genetically encoded calcium indicators (GECIs), meaning there are biological steps needed to perform calcium imaging in freely-behaving animals.
First, you must express the genetic indicator in the brain. Second, you need to implant an imaging probe to collect fluorescent signals from the brain.
Genetic Sensor Expression
The first step, and most important, is achieving optimal GECI expression in your animal model.
Mice are the most common animal model used for in vivo calcium imaging due to the advancement of genetic mice models (Daigle et al. 2018); however, calcium imaging has slowly progressed in rats and non-human primates (Scott et al. 2018; Kondo 2018).
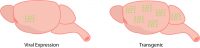
Neuroscientists employ two methods to express GECIs in the brain: viral expression and transgenic animal models.
Viral expression involves injecting a virus encoding a GECI in the brain. This virus is linked to a gene of interest, targeting expression to a specific cell-type.
A crucial step associated with viral expression is testing varying dilutions of the virus to obtain optimal expression in the brain (Resendez et al. 2016). Too little expression can lead to no signal, and over-expression can lead to high background fluorescence–or even cell death!
Neuroscientists employ viral expression to regulate GECI expression. This technique is useful because expression can vary depending on the brain region, cell-type, or virus. Also, viral expression can be used to express GECIs in brain projections to map neural circuits across brain regions.
In comparison to manual viral injections, transgenic animal models are designed to express the GECI throughout the entire brain (Dana et al. 2014). Depending on the transgenic model, GECI expression can vary from region to region, such that one region may express the GECI more than another. Neuroscientists examining large cortical areas use these models as they require much more widespread expression, rather than a single region of interest (Dana et al. 2014).
Imaging Probe Implantation
After successful GECI expression, you need to access the fluorescent signal inside the brain. But how can you see into the brain when it’s covered by both skin and skull?
Generally, this involves surgically implanting an imaging probe into the brain where the GECI is expressed to visualize activity. There are three types of probes (optical cannula, cortical window, GRIN lens) that are used for in vivo calcium imaging. The probe you select is dependent on two main factors:
- Do you require cellular-resolution imaging?
- Will you be imaging a deep or superficial brain region?
Optical cannulas enable light to be delivered and collected from the brain. These probes are used in fiber photometry experiments. Due to their design, optical cannulas are only capable of collecting one signal or a population signal, providing no spatial resolution to image individual neurons. Depending on the length of the optical cannula, they can be used to collect a fiber photometry signal from shallow or deep brain regions. Another bonus is optical cannulas are the least invasive to be implanted in the brain because of their compact design, which leads to minimal tissue damage.
In contrast, cortical windows replace a large portion of the skull with a glass window. Neuroscientists employ cortical windows when imaging a large cortical region on the surface of the brain or the entire cortex. Cortical windows can provide access to the cortex for cellular-resolution or large-scale calcium imaging recordings.
Lastly, a GRIN lens is a microendoscopic probe that can be implanted in the brain to image individual neurons. GRIN lenses differ in lengths, enabling neuroscientists to image shallow to deep brain regions (up to 8mm). GRIN lenses are typically limited in diameter (0.5–1mm). Thus, imaging with GRIN lenses provides a relatively small field of view, compared to cortical windows, and the implantation of a large GRIN lens can lead to tissue damage, compared to an optical cannula. However, a GRIN lens is the only imaging probe available to image with cellular-resolution in the brain of a freely-behaving animal.

Equipment Components
Now that you have all your biological components set up, you need equipment to record fluorescent signals from the brain of a freely-behaving animal.
The systems currently available for in vivo calcium imaging are comprised of three main components:
- Coupling between the imaging probe and imaging device
- Light source and filter set
- Imaging device
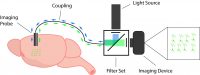
Coupling Between Imaging Probe and Imaging Device
Fluorescent signals are emitted from neurons expressing the GECI, and this is transmitted through the imaging probe. But how can data be collected?
First, you need a coupling between the imaging probe, light source, and imaging device. This coupling enables the GECI to be illuminated in the brain through the imaging probe, and subsequently, the transmission of the emitting fluorescent signal is sent to the camera. Depending on the calcium imaging system design, this coupling may be achieved via an imaging fiber, optical fiber, or the system may be directly mounted onto the head of the animal, such as the miniscope.
Light Source and Filter Set
GECIs generate fluorescence signals, such that they have an excitation and emission spectrum (Grienberger & Konnerth 2012). To excite GECIs and filter the emitted signal, you require two components: a light source and dichroics/filters.
LED light sources are commonly selected for in vivo calcium imaging since low optical power is required. However, if a larger region of interest is being illuminated, a high-power laser may be required. There is a balance between too little and too much power: not getting enough signal and photobleaching your sample, respectively.
Importantly, the correct excitation wavelength must be selected. For example, GCaMP excitation is blue (~470nm) and emission is green (~530nm).
And this is where the second component is necessary. Dichroics and filters allow for the transmission of the correct excitation and emission wavelength to the imaging device.
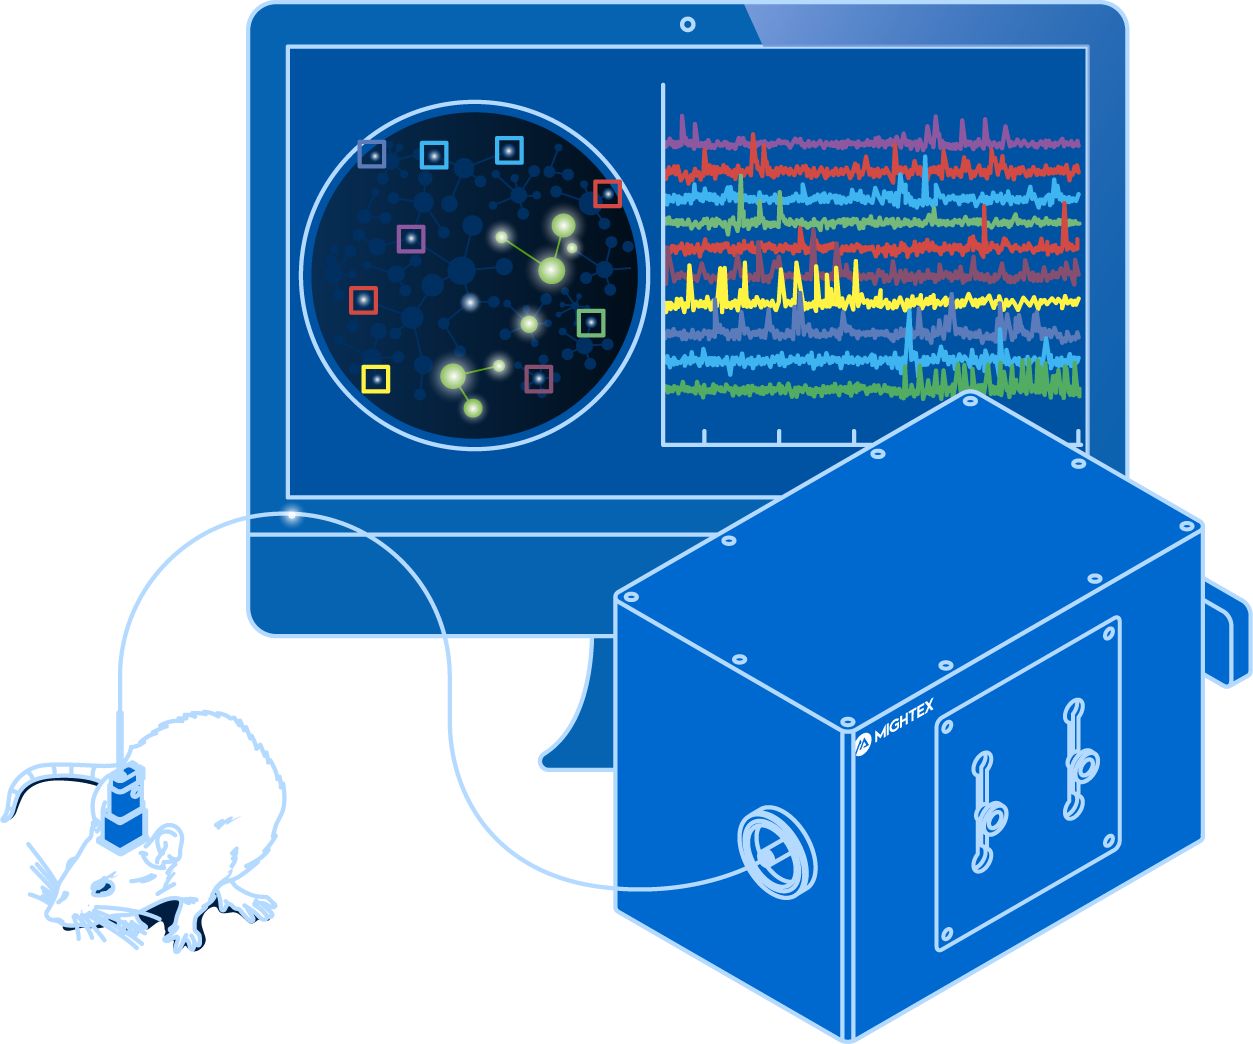
Imaging Device
Lastly, you need to collect and analyze fluorescent signals from the brain. This is made possible using an imaging device.
Three types of imaging devices are used for in vivo imaging systems: 1) scientific camera, 2) PMT, and 3) photodetector. The imaging device used is somewhat dependent on the calcium imaging system. If you’re interested in learning more about the differences between imaging devices, this is a helpful article.
Successful in vivo calcium imaging is a balancing act between biology and equipment. Luckily, both the biology and equipment are constantly being optimized for better performance and ease of use, making the technique more accessible to labs worldwide.
Next Post
What Systems are Available for In Vivo Calcium Imaging?
——————————
Related Products for In Vivo Calcium Imaging
Freely-Behaving Calcium Imaging
and optogenetics to probe complex neuronal networks.
- Simultaneous Cellular-Resolution Imaging and Optogenetics
- Multi-Region Investigation
- Reconfigurable Platform
- High-Quality Imaging with Scientific Cameras