


Optogenetics unlocks the ability to activate or inhibit select populations of neurons. With this technique, researchers have been able to investigate the causal relationship between neural activity, function, and behaviour. The popularity of optogenetics is evident from the surge in publications featuring the technique since its invention in 2005 (Boyden et al. 2005).
Labs that are new to the technique are probably wondering, what equipment do you need to perform optogenetics?
Biological Components
The first step to successfully perform optogenetics is grasping the biological components. This consists of selecting the appropriate optogenetic probe, expressing the optogenetic probe in the brain region and neurons of interest, and implanting an optical cannula (if you are performing freely-behaving experiments).
Expression
The crucial first step for optogenetic experiments is selecting the appropriate optogenetic probe.
Do you want to activate or inhibit the neuron population of interest? How fast do you want to stimulate the population of interest? Do you need to use a specific wavelength for optogenetic stimulation (e.g., combining with imaging)?
These are some of the questions that will help you choose the appropriate optogenetic probe for your experiments (see here for a great guide from Addgene summarizing currently available optogenetic probes).
Once you’ve selected the optogenetic probe, it must be expressed in the brain. Neuroscientists employ two methods to express constructs in the brain: viral expression and transgenic mouse models.
Viral expression involves injecting a virus encoding an opsin in the brain (Mei & Zhang 2012). This virus is linked to a gene of interest that targets expression to a specific cell-type (Mei & Zhang 2012).
Neuroscientists employ viral expression to regulate opsin expression or restrict it to a particular brain region. This is useful because expression can vary depending on the brain region, cell-type, or virus. In addition, neuroscientists can use viral expression to express opsin in brain projections to map neural circuits across brain regions (Mei & Zhang 2012).
In comparison to viral injections, transgenic mice models are designed to express opsins throughout the entire brain (Mei & Zhang 2012). Depending on the transgenic model, opsin expression can vary from region to region, such that one region may express the opsin more than the other. Transgenic mouse models may be used to produce more stably reproduced mouse lines for optogenetic expression in specific cell-types. Or, neuroscientists examining large cortical areas use these models as they require much more widespread expression, rather than a single region of interest.
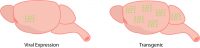
Optogenetic probes can be expressed through viral expression (on the left), and this limits expression to a specific cell-type and localizes in a specific brain region. In comparison, transgenic expression (on the right) is widespread throughout the brain.
Implantation of a Cannula (For Freely-Behaving)
For freely-behaving optogenetic experiments, light needs to be transmitted into the brain while the animal is moving. This is accomplished by surgically implanting an optical cannula into the brain region expressing the optogenetic probe. An important step in selecting an optical cannula is selecting the appropriate length to reach the target brain region.
Once implanted, a light source is connected via a fiber-optic cable (see below for more details) and the area below the cannula will be illuminated. The spread of light and penetration depth will be dependent on tissue and light source wavelength (this is a helpful calculator from the Deisseroth lab: https://web.stanford.edu/group/dlab/cgi-bin/graph/chart.php).
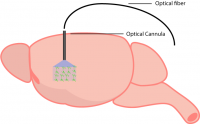
An optical cannula is implanted into the region expressing the optogenetic probe.
Equipment Components
Two experimental setups are used for optogenetic experiments: microscopy and freely-behaving. These two different approaches for optogenetic stimulation have distinct components.
Microscope Optogenetics
Optogenetics can be performed during microscopy experiments and synchronized with other microscopy methods.
For neuroscience experiments, researchers commonly integrate optogenetics into their electrophysiology rigs—usually on a standard epi-fluorescence microscope—to probe neural activity during their recordings (Andrasi et al. 2017), or they integrate optogenetics with their two-photon imaging experiments to probe neural activity during imaging (Forli et al. 2018).
For cell biology, researchers will integrate optogenetics into their confocal imaging experiments to probe different genetic perturbations (van Haren et al. 2018).
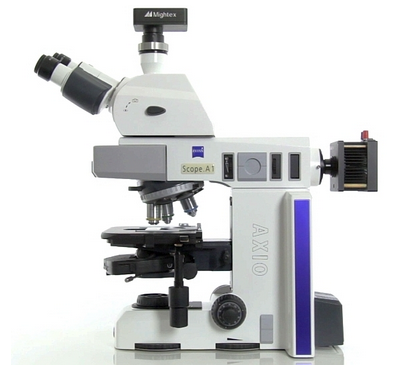
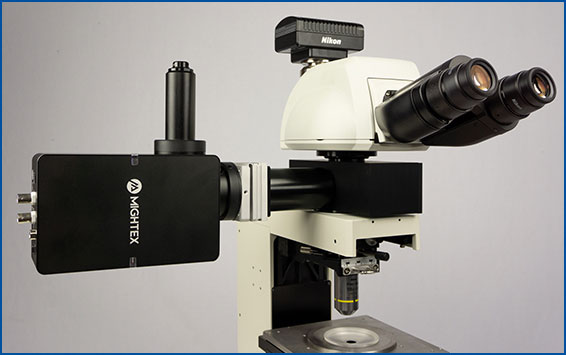
For these microscopy setups, there are two main components required to integrate optogenetics: a light source and a filter set. The light source is used to illuminate the sample and activate the optogenetic probe, and it is important to select the appropriate light source for your optogenetic probe.
For most microscopy setups, a collimated light source will be connected to the back epi-fluorescence port to illuminate the sample. Depending on the light source, it will be connected via direct coupling to the backport or coupled via lightguide/fiber to the epi-fluorescence port.
Light will travel through the epi-fluorescence port to the filter turret, where it will be directed onto your sample through the objective. The objective will dictate the field of view and power of the light source for optogenetic stimulation (i.e., lower magnification leads to a larger field of view but also lower light intensity).
As mentioned above, the light will be directed to the filter turret before being reflected onto the sample. Thus, it is crucial to select the appropriate filter set to direct the correct wavelength to the sample, and potentially block it from reaching the camera depending on your experiment.
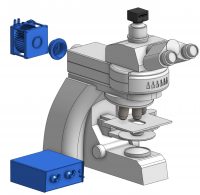
Example of a microscope optogenetics setup.
Another method is to externally illuminate the sample independent of the microscope. A fiber-coupled light source or spotlight light source may be used for this particular application. This method may be used because the epi-fluorescence port is already occupied or you want to target part of your sample.
Of importance, researchers want to accurately synchronize their optogenetic stimulation with either electrophysiology or imaging equipment. The ability to synchronize and control the light source via analog or TTL signals is crucial for proper synchronization. For example, researchers may want to illuminate their sample for a specific amount of time during an electrophysiology recording.
Freely-Behaving Optogenetics
Optogenetics provides a causal method to test the link between neural circuits and behaviour. Thus, researchers need to perform this method in a freely-behaving animal, which requires a different setup compared to microscopy experiments.
There are three main components for freely-behaving experiments: an optical cannula, a fiber-optic cable, and a light source.
As previously mentioned, the optical cannula is implanted into the region of interest expressing the optogenetic probe to illuminate light into the brain. Generally, the optical fiber is coupled to the optical cannula and connected to a fiber-coupled light source. This enables light to travel from the light source to the brain of the freely-behaving animal. A flexible optical fiber allows the animal to behave freely and illuminate the brain for optogenetic stimulation.
Depending on the complexity of the animal’s behaviour, researchers may use a commutator, which prevents the fiber from getting twisted and restricting the animal’s behaviour.
Researchers may want to synchronize optogenetic stimulation with certain behavioral events or equipment, similar to microscopy optogenetics experiments. For example, if an animal moves into a certain region, researchers may want to perform optogenetics for a specific amount of time. This is possible through synchronization with TTL or analog signals.
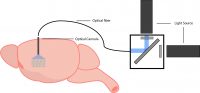
Example setup for freely-behaving optogenetics.
Next Post
Selecting an Optogenetic Light Source: LED vs. Laser
——————————
Related Products for Optogenetics
- Wide-range of wavelengths (from UV to NIR) for different optogenetic probes
- High-power LED sources
- Modular and reconfigurable for multiple wavelengths.
- Compatible with any microscope

- Wide-range of wavelengths (from UV to NIR) for different optogenetic probes
- High-power LED sources
- Modular and reconfigurable for multiple wavelengths.
- Compatible with rotary joints
for Cellular-Resolution Optogenetics
spatiotemporal control of light with subcellular resolution.
- Cellular-Resolution Optogenetics
- Simultaneous Multi-Region Illumination
- Synchronize with Electrophysiology or Imaging
- Compatible with Any Microscope